How to Hitch a Trailer: A Step-by-Step Guide
Jul 17, 2023
In today's article, we will explore the process of installing a backup camera in your vehicle. With the increasing importance of safety on the roads, backup cameras have become a popular accessory for RVs, trucks, and trailers. By providing a clear view of what's behind your vehicle, a backup camera can help prevent accidents and make parking easier. In this guide, we will walk you through the installation process, step by step, ensuring that you can enjoy the benefits of a backup camera.
Table of Contents:
- 1. Understanding Backup Cameras
- 2. Why You Need A Backup Camera Installed In Your Car?
- 3. Types of Backup Cameras
- 4. Wired or Wireless: What's Right for You to Install?
- 5. What You Need to Install the Rear Backup Camera?
- 6. Backup Camera Installation Guide (Step-by-Step)
- Step 1. Buy an suitable camera for your vehicle
- Step 2. Check whether the monitor and camera are paired
- Step 3. Remove the Furrion mount from your RV
- Step 4. Inspecting the trailer wires
- Step 5. Assembling the Haloview mounting bracket
- Step 6. Connecting the camera to the trailer wiring
- Step 7. Test the camera and monitor
- Step 8. Mounting the backup camera to the trailer
- Step 9.Testing and Adjusting the Backup Camera
- 7. Tips for Maintaining a Backup Camera
- 8. Frequently Asked Questions
- 9. Final Thoughts
Understanding Backup Cameras
Before we delve into the installation process, it's important to understand what backup cameras are and how they work. Backup cameras, also known as rearview cameras or reversing cameras, are small video cameras mounted on the rear of a vehicle. They capture a wide-angle view of the area behind the vehicle and display it on a monitor or screen in the driver's cabin. This allows the driver to have a clear and real-time view of any obstacles or pedestrians when reversing.
Why You Need A Backup Camera Installed In Your Car?
The installation of a backup camera brings numerous benefits to drivers. It greatly enhances safety by providing improved visibility while reversing. It minimizes blind spots and helps drivers avoid collisions with objects or individuals outside their field of vision.
1. Accident Prevention: Accident prevention is the main reasons for needing back up cameras for cars. You can minimize your chances of hitting someone or something while backing up if you can see exactly what is behind your vehicle, and that is only possible with a visual aid, like a backup camera.
2. Person: Installing a vehicle backup camera is a matter of safety and a must for those with small children it can help those with poor visibility issues to prevent possibly hitting their children.
3. Reduce financial Loss: The other reason why you need to install backup cameras at the rear of your car is also the issue of financial damage that may arise once you hit on objects. Although no data is available, the cost of all these back over accidents must be extremely high. The cost of injuries aside; let alone thinking of the cost to repair property, vehicles, and the time spent sorting out these accidents.
4. Required Accessories for Cars:The Backup camera systems represent the newest breakthrough in car safety. Just like the shuttering glass and the seat belts invented before this a current safety installation that cannot be avoided.
Types of Backup Cameras
There are several types of backup cameras available in the market. Each type offers distinct features and installation options. The common types include:
License Plate Cameras: These cameras are integrated into a license plate frame and are relatively easy to install.
Flush-Mount Cameras: Flush-mount cameras are installed into a small hole drilled into the vehicle's body, providing a sleek and inconspicuous appearance.
Surface-Mount Cameras: These cameras are attached to the exterior surface of the vehicle, offering versatility in positioning and mounting.
Wireless Backup Cameras: As the name suggests, these cameras transmit the video feed wirelessly to a monitor, eliminating the need for complex wiring.
Wired or Wireless: What's Right for You to Install?
Wireless Backup Camera: Digital wireless backup cameras use a wireless transmitter and receiver to transmit images from the RV backup camera to the monitor. Wireless RV backup cameras are the easiest to install, and two power source is needed. RV-like longer vehicles should go for the wireless version, as wired one becomes tough to get installed.
Wired Backup Camera: In wired backup camera systems, the camera/monitor is connected to a power harness. A cable is run the length of the vehicle connecting the components, and only one power source is needed. Wired Backup cameras may produce higher picture-quality than wireless ones, but the installation of this reverse camera is much difficult as you need to run wires from back to your cab.
What You Need to Install the Rear Backup Camera?
The tools or accessories to install it you will need are simple:
1. Furrion camera adapter:For the Furrion prepped RV, you have to use our bracket adapter to install the camera to avoid drilling holes and cutting wires on your RV. For the RV doesn't come with Furrion mount, you may not want to drill holes, then you can refer to this blog to install the backup camera.
2. Screwdriver
3. Pliers
4. Silicone sealant
Backup Camera Installation Guide (Step by Step):
In this installation guide, we will show you how to install Haloview backup camera MC7108 on a Furrion pre-wired RV.
Step 1. Buy an suitable camera for your vehicle
Obviously, the first step is to find an appropriate camera for your car. According to the distance from monitor to camera to choose the best backup camera fit with your vehicle. We highly recommend installing our Byte tango series backup camera system when the distance over 33 foot.
Step 2. Check whether the monitor and camera are paired
Remember to do pairing before installing the camera! Plug the cigarette lighter power cable adapter into the cigarette lighter in your cab, then connect it to the Paring Cable, at the end of the Paring Cable are two DC male connectors, which you can connect to the power cable of the camera and monitor. Please refer to the wiring diagram below. Press the push on button on the cigarette lighter power cable adapter to get them powered.
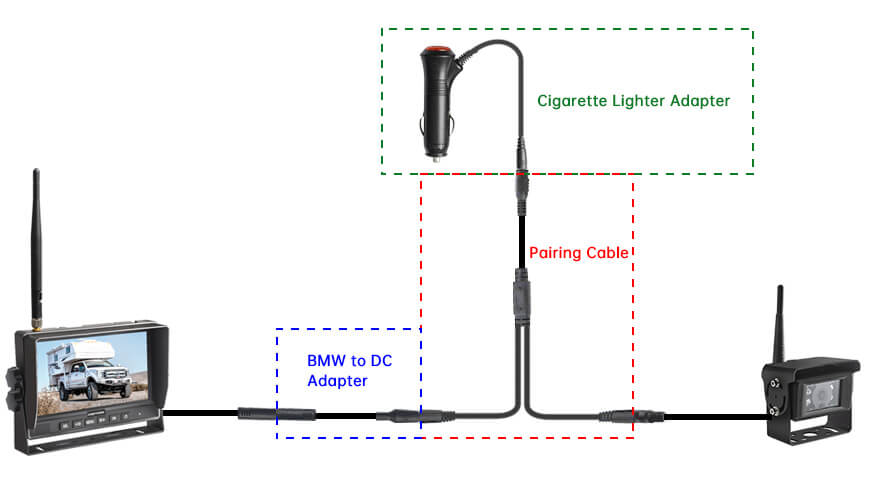
If the camera is not paired to the monitor, you can follow the steps below to pair:
- Press OK button for 3 seconds to enter PAIRING status,you will have 20 seconds for pairing.
- Disconnect the camera from the Pairing Cable, and connect them again, the camera will pair to the monitor automatically.
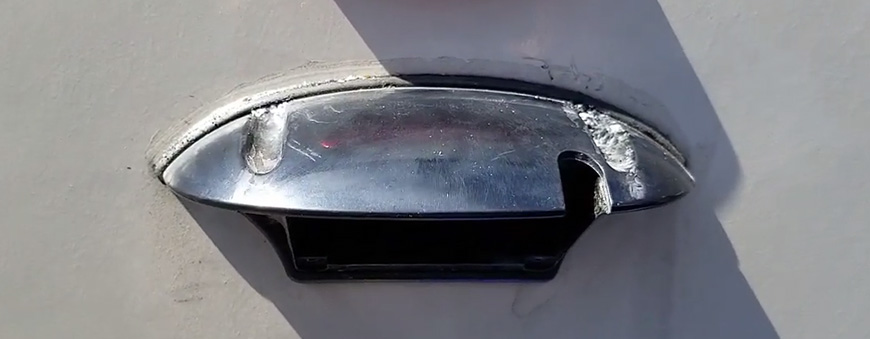
Step 3. Remove the Furrion mount from your RV
As you can see in the left picture, you'll want to remove some of this sealant to access the screws with blade or screwdriver. After the sealant removed and the screws taken out, you can just pull the shark-fin bracket off which will expose the wiring. The rubber gasket we will be keeping it just since it does a good job of sealing out the water.
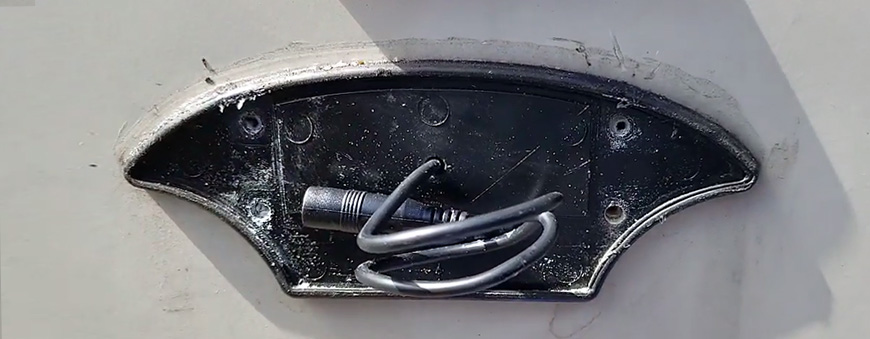
Step 4. Inspecting the trailer wires
Removed the rubber, here you'll actually see where this wiring, it is converted over to the 12-volt and that goes into the clearance lights, the backup camera will get power from here. With the Furrion wiring adapter, which is included in the Furrion camera adapter, you don't have to do any cutting of wires.
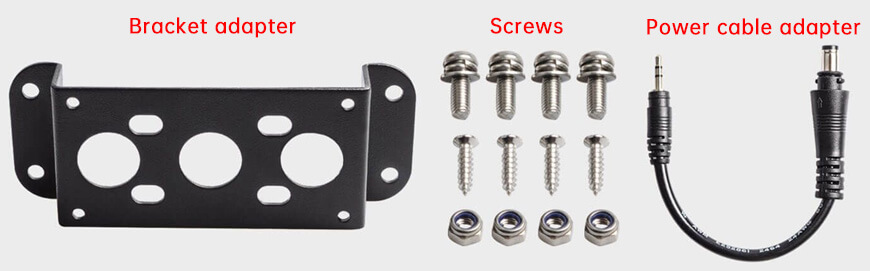
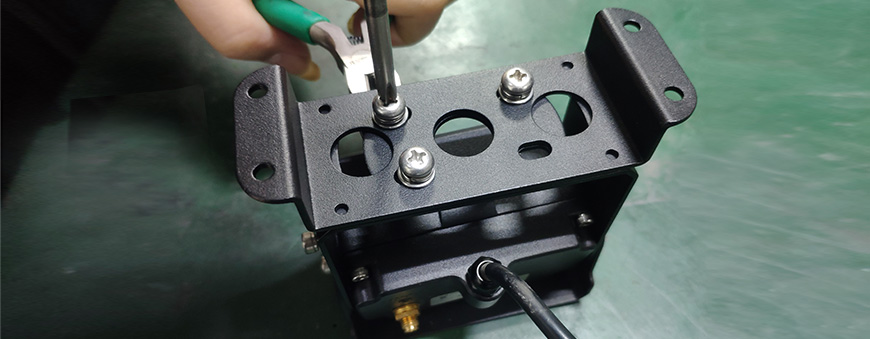
Step 5. Assembling the Haloview mounting bracket
One thing you'll need to know is our bracket adapter, it'll line up with the factory hole on the Furrion rubber, so you won't have to drill any different holes. To get the brackets hooked up, you need to put the screws this way like the picture below, clamp the nut with pliers and use the screwdriver to tighten them.
Step 6. Connecting the camera to the trailer wiring
When you have the camera hooked up, back to the ladder and connect the camera to the trailer wires with the Furrion wiring adapter. Before you actually mount it and finalize everything, you have to test out the camera and the monitor in case that the voltage not enough to get the camera powered. Some Chevy or GMC truck's power supply voltage is not enough to get 12V for the trailer, so you need to add this booster module to solve the issue.
Step 7. Test the camera and monitor
Power on the monitor and turn on the clearance lights to activate the camera wiring, then what you have to do is check whether your monitor has an image, if it doesn't, read your installation manual for troubleshooting information. The next step you can complete the backup camera installation.
VERY IMPORTANT TIP FOR PEOPLE INSTALLING WITH A FURRION BRACKET ON THE BACK OF THEIR RV:
Furrion wire is attached to RV's rear red marker lights. After you have installed the camera up on the RV, you must plug in your vehicle to the camper with your 7 pin cord, and then turn your actually headlights on in the vehicle....NOT daytime running lights because that won't turn on your RV marker lights. That's how the Furrion pre-installed plug gets its power, thru the red marker lights.
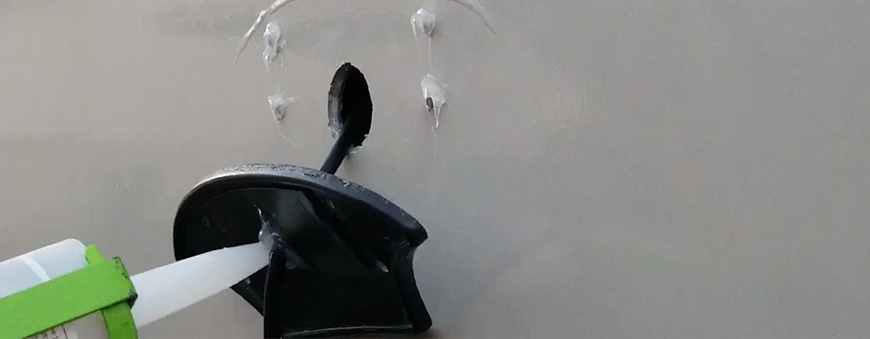
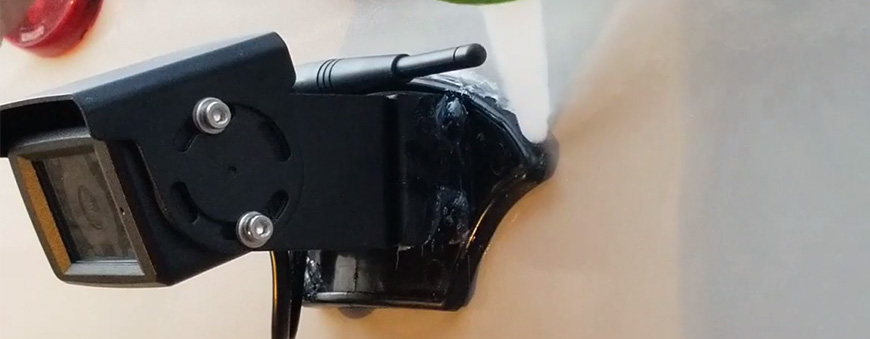
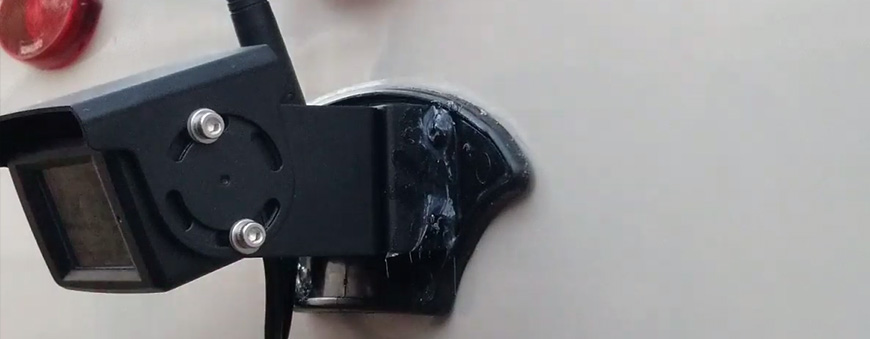
Step 8. Mounting the backup camera to the trailer
Now you need to add silicone sealant to prevent water from entering the wall, put some silicone in the four mounting holes, and then when the screw goes in, you will seal it, also add some where the wire goes in.
Running the cable through the center hole on the rubber and putting the wires inside the wall, so it will not dangle outside, Fiberglass RVs wall is filled with white foam, you can hollow out a small area with your hands. A very important tip: don't put all the wire back inside the wall, you can make a drip loop.
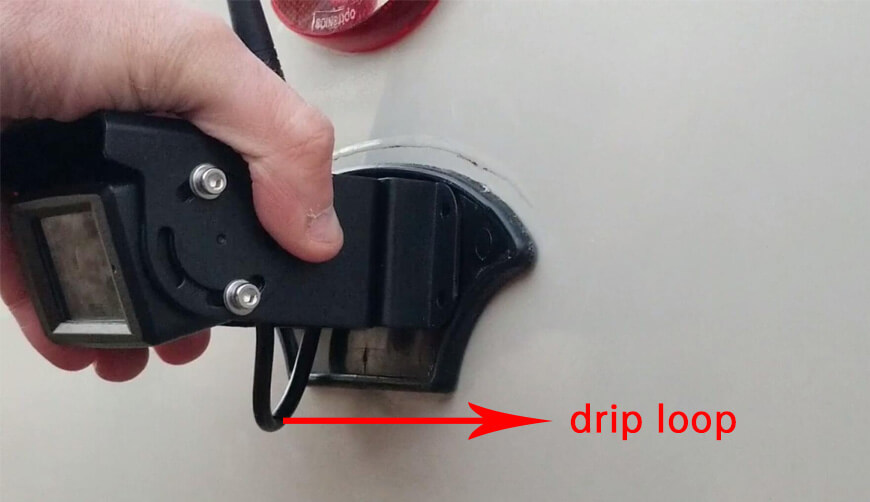
A drip loop just like on a subpar line outside your house or if you go look at the internet cable or telephone lines coming into your house, you'll actually see this little loop of wire cable hanging down and so that if any water gets on it, the water will go down and then drop off, otherwise, the water will follow and go right inside the hole, so with a drip loop you'll have it go down and just drop off the bottom.
Put the four screws in and get it mounted up, then add a little bit of silicone to the screws, so when you tighten them down, it'll make a nice waterproof barrier. Next, tighten them down and add silicone over the top of rubber, and it's very important don't silicone the bottom since if any water were to get in, you'd want to be able to drip out the bottom, if you sealed it and it got in the top, it would pool inside it and they would have nowhere to go except for in the trailer.
Step 9. Testing and Adjusting the Backup Camera
Now, you have the camera mounted and everything's wired up, get into the cab and test the monitor to make sure it's working properly. Adjust the angle view of your camera to ensure that it effectively covers the area you want to see. Then you need to install the monitor. The most common places for the monitor are on the dashboard, the windshield, and in the rear view mirror.
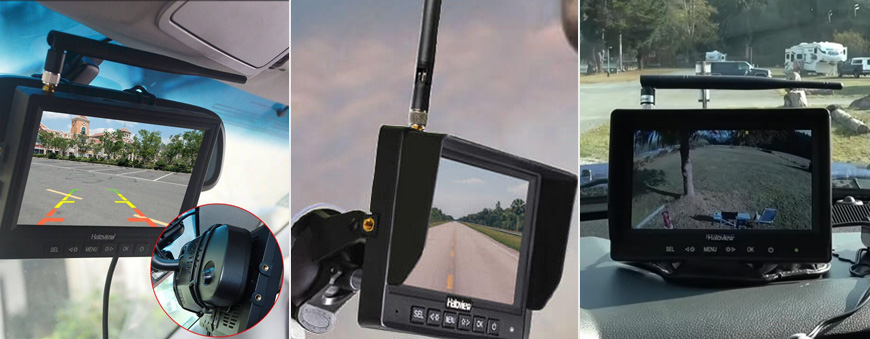
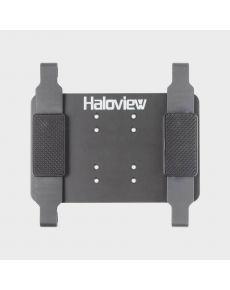
Mirror
Haloview RVMB01 Mirror Mount for Rear View Camera Monitor
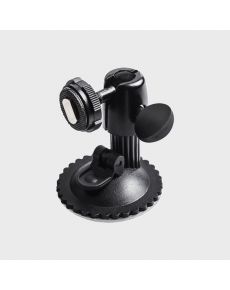
Windshield
Monitor Suction Cup Mount Bracket
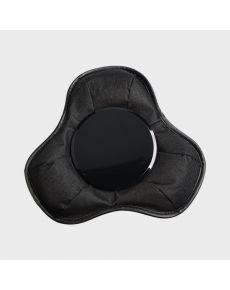
Beanbag
Beanbag Mount for Haloview Monitors
Congratulations! You’ve just installed a new backup camera on your RV. If you’re experiencing problems, please contact us via [email protected].
Tips for Maintaining a Backup Camera
To keep your backup camera functioning optimally, follow these maintenance tips:
- Regularly clean the camera lens to ensure a clear view.
- Inspect all wiring connections for signs of wear or corrosion and repair as needed.
- Protect the camera from extreme temperatures and harsh weather conditions.
Frequently Asked Questions
Q: Can I install a backup camera myself?
A: Yes, installing a backup camera can be a DIY project, but it requires some technical skills. Follow the step-by-step guide provided in this article, or consult a professional if you're unsure.
Q: How much does a backup camera installation cost?
A: The cost of installation can vary depending on the complexity of the installation and the type of vehicle. DIY installation can save you money, but professional installation ensures proper setup.
Q: Are wireless backup cameras reliable?
A: Wireless backup cameras can be reliable, but signal interference or range limitations may affect their performance. Consider the specific requirements of your vehicle and choose accordingly.
Q: Can a backup camera be installed in older vehicles?
A: Yes, backup cameras can be installed in older vehicles. However, the installation process may be more involved, and additional components may be required to integrate the camera with the vehicle's existing systems.
Q: Are backup cameras waterproof?
A: Most backup cameras are designed to be waterproof or weather resistant. However, it's essential to check the manufacturer's specifications before purchasing to ensure suitability for your vehicle's environment.
Q: Do backup cameras work at night?
A: Many backup cameras have night vision capabilities, utilizing infrared LEDs or low-light sensors to provide visibility in dark conditions. Check the specifications of the camera you choose.
Final Thoughts
Installing a backup camera can significantly enhance the safety and convenience of your vehicle. By following the step-by-step guide provided in this article, you can successfully install a backup camera and enjoy the benefits it offers. Remember to choose a camera that suits your needs, gather the necessary tools, and take the time to test and adjust the camera for optimal performance. Drive with confidence and peace of mind knowing that you have an extra set of eyes on the road behind you.
Comments (6)
Jeff akers -
Tuesday, May 31, 2022
My pre wire was cut… how and where can I hard wire wire that came with camera
kathy Birt -
Wednesday, March 30, 2022
we followed all instructions but cannot get the screws to tighten that attach to the RV ! The whole thing would fall off if we had kept it this way so for now we took it down not knowing how to procede. we are using the bracket that allows the camera to attach to the Furion bracket
Bill -
Sunday, March 27, 2022
Did you cut the rubber seal to get the wire through?
gary watts -
Thursday, September 2, 2021
Good video. Informative while not belaboring. I like the fuse idea. That helps. My wife also bought the side cameras. I will be adding those as well. Safe travels to all.
PS. TRUMP WON. Y’all might be concerned how things went down regardless of your leanings because evil does exist.
Chris Zachow -
Sunday, May 23, 2021
Is there a power cord that hooks up to 115 volt my new truck does not have a cigarette lighter
steve Wilson -
Monday, January 18, 2021
Hello
I have the Halo view monitor and two camera's. The first one I've using for a while and it works great. Now I'm installing a second camera and followed the instructions but can't seem to get the second one to pair. I need so e help!! Thank you
Load More Comment...

Lastest Posts
-
-
Top 15 Backup Camera Mounts And Brackets May 30, 2022
-
Car Blind Spot - Everything You Need to Know Mar 11, 2022
-
Aftermarket Blind Spot Monitor Jan 4, 2022
Categories